One of the promises I’ve made to myself is to slow down and truly enjoy small things in life. One of my new loves is simply taking time to make my lattes on the morning with an Italian Bialetti stainless steel stove top espresso maker. Or should I say caffè latte..? On our first day in Italy my husband ordered due lattes, and I was slightly amused we got two hot cups of milk. I do like mine with extra milk, but not without espresso, thank you very much.
I bought a Bialetti Venus stove top espresso maker ($39.13) and love making my coffee with it on the mornings. Yes, it takes a little longer than with any semi-automatic espresso machine, and you have to watch it to be done on the stove, and especially you have to watch the milk so you won’t burn it while steaming it… but that’s the whole point. You slow down that much that you actually take 5 minutes of your time to make coffee, and not just push a button. Bonus that this is inexpensive way to get your started making lattes, cappuccinos and espresso at home and you can invest your money on good quality coffee instead of an expensive espresso maker. (I like Illy and Lavazza)
If you want to splurge on an espresso machine, read which one is my favorite.
 Frothing pitcher
 Frothing wand
 Espresso ground coffee
Milk
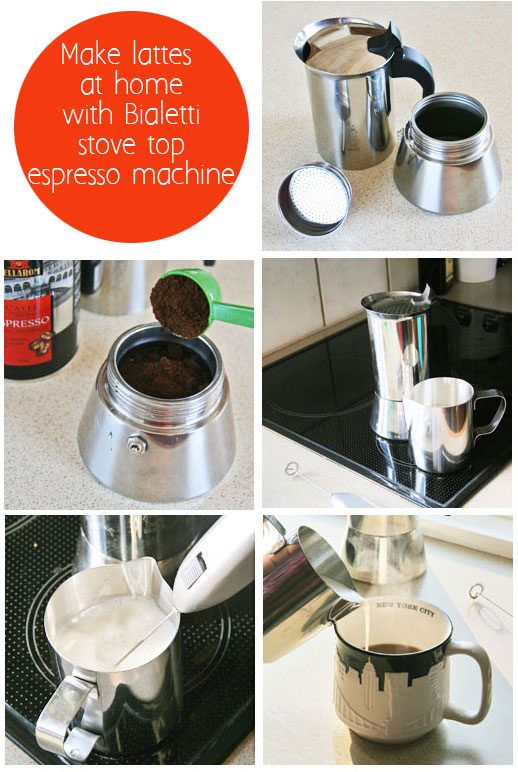
 1. Add fresh cold water to the water tank – that’s the lower part of the espresso maker, and you can unscrew it from the top. Fill it up to safety valve, don’t top it.
2. Put the coffee filter on the top of the water tank and fill it with ground coffee. Important: most espresso machines require you to press down the coffee, but do not press down the coffee grounds with Bialetti. It took me a while to get rid of an old habit.
3. Screw the top on the water tank and place your espresso maker on the stove top. I use high heat on an electric stove top. Lower heat on gas stove top works better, but after a few tries you’ll learn what works the best for you. The coffee is ready when it makes this gurgling sound and stops percolating coffee.
4. Steam your milk in the frothing pitcher, and once it starts warming up, froth it with the frothing wand.
5. Pour your coffee in a cup and pour the milk on the top slowly. You can use a spoon to first pour the milk and then scoop as much froth on the top as you like.
Extra Tips:
You can do without the frothing pitcher, and you can even warm your milk in the microwave, or in a small pot, and then froth it with the frothing wand, or even whisk it with a small whisk, which takes much longer but actually tastes better than this faster method.
I do recommend getting good quality coffee meant for espresso and ground very thin, you can’t make espresso coffee with coarsely ground coffee. The best is if you also get a coffee grinder and grind it right before brewing.
Always remember to storage your coffee in an air-tight container.
I didn’t add how much coffee or how much milk to use on purpose – it depends what kind of coffee you use and how much milk you like in your latte. I use different amounts depending which coffee brand I’m using, or which milk I’m using ( for example less milk when it has more fat, more milk if I use skinny milk).
NOTE: I bought the Bialetti stainless steel espresso maker, it makes a little bit smoother tasting coffee than the original aluminum pot, the Bialetti Moka.

How to make lattes with Bialetti stove top espresso maker
You will need: Bialetti Venus stove top espresso maker 1. Add fresh cold water to the water tank – that’s the lower part of the espresso maker, and you can unscrew it from the top. Fill it up to safety valve, don’t top it.
2. Put the coffee filter on the top of the water tank and fill it with ground coffee. Important: most espresso machines require you to press down the coffee, but do not press down the coffee grounds with Bialetti. It took me a while to get rid of an old habit.
3. Screw the top on the water tank and place your espresso maker on the stove top. I use high heat on an electric stove top. Lower heat on gas stove top works better, but after a few tries you’ll learn what works the best for you. The coffee is ready when it makes this gurgling sound and stops percolating coffee.
4. Steam your milk in the frothing pitcher, and once it starts warming up, froth it with the frothing wand.
5. Pour your coffee in a cup and pour the milk on the top slowly. You can use a spoon to first pour the milk and then scoop as much froth on the top as you like.
Extra Tips:
You can do without the frothing pitcher, and you can even warm your milk in the microwave, or in a small pot, and then froth it with the frothing wand, or even whisk it with a small whisk, which takes much longer but actually tastes better than this faster method.
I do recommend getting good quality coffee meant for espresso and ground very thin, you can’t make espresso coffee with coarsely ground coffee. The best is if you also get a coffee grinder and grind it right before brewing.
Always remember to storage your coffee in an air-tight container.
I didn’t add how much coffee or how much milk to use on purpose – it depends what kind of coffee you use and how much milk you like in your latte. I use different amounts depending which coffee brand I’m using, or which milk I’m using ( for example less milk when it has more fat, more milk if I use skinny milk).
NOTE: I bought the Bialetti stainless steel espresso maker, it makes a little bit smoother tasting coffee than the original aluminum pot, the Bialetti Moka.


